The corona in all its splendour
HDR composite of a solar eclipse
A total solar eclipse is visually much more impressive than a mere photo from a digital camera. How can you improve on that?
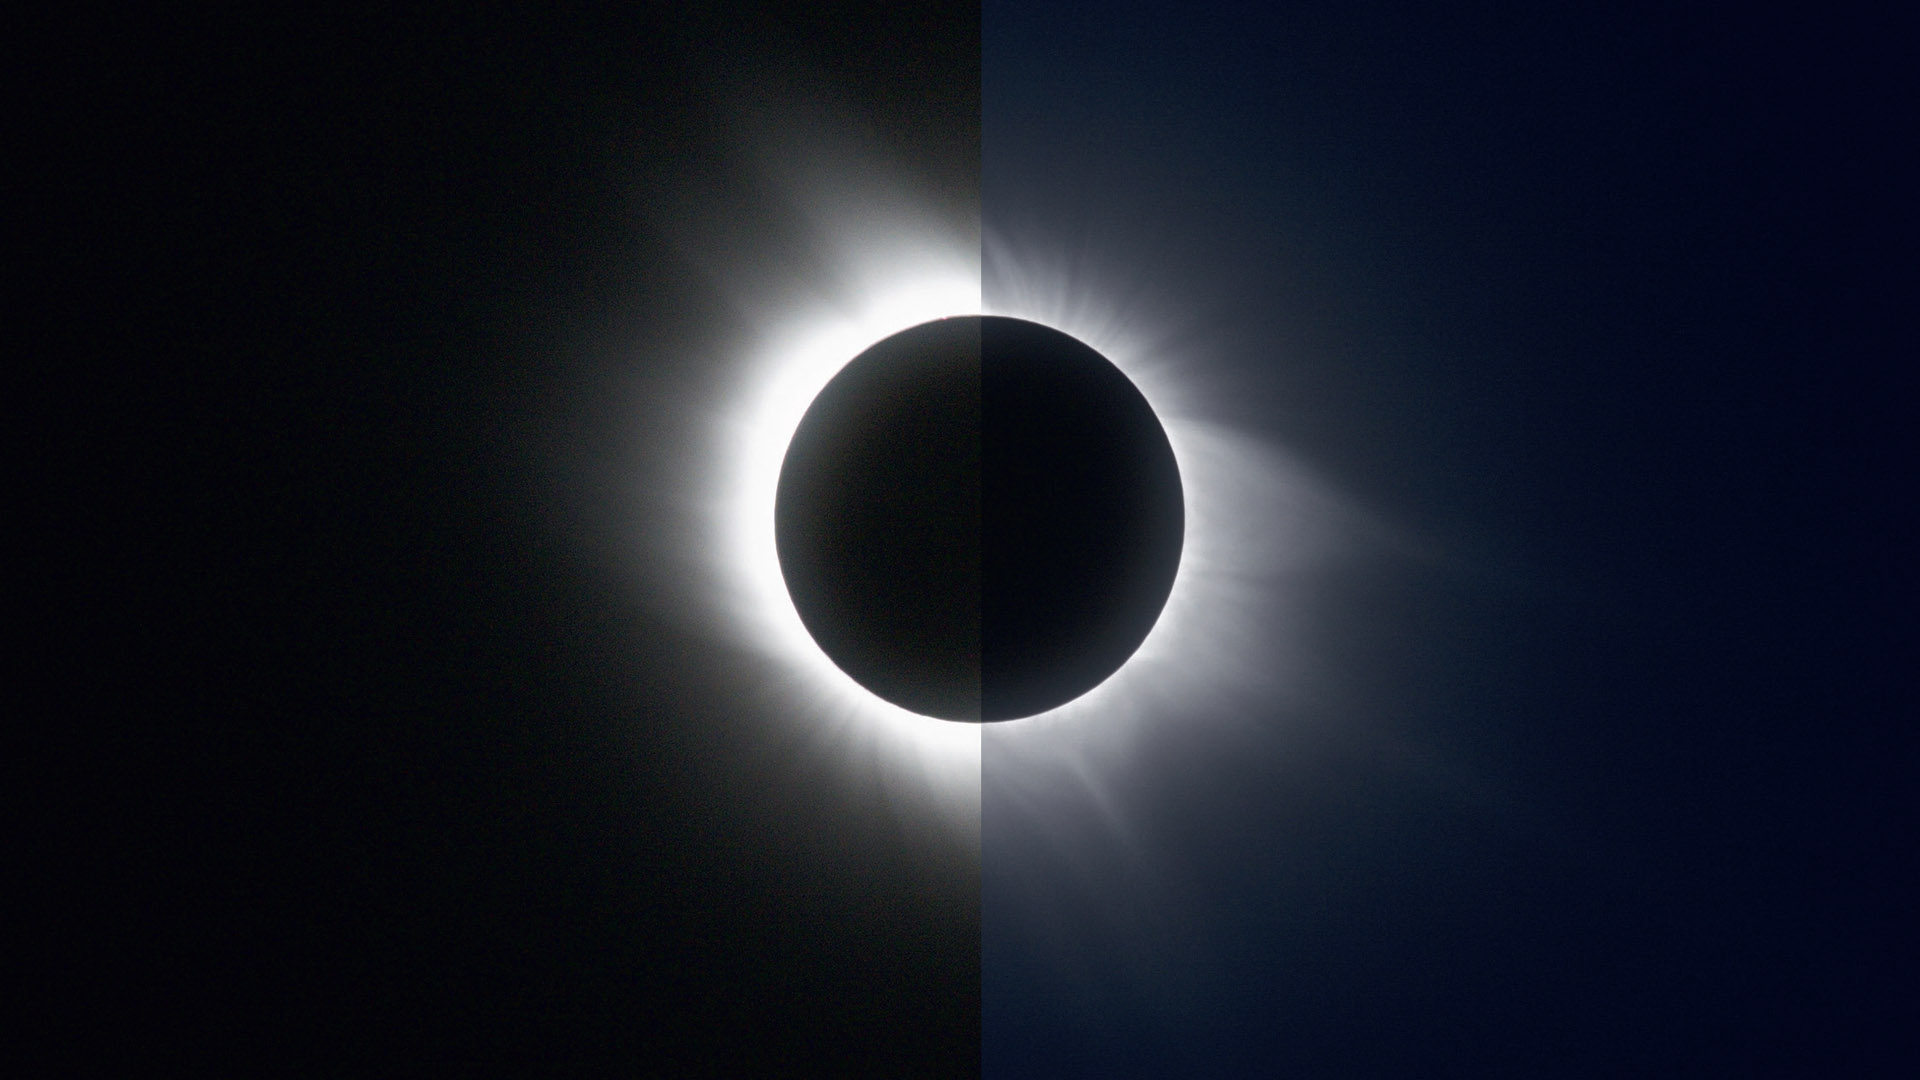
 Two views of the 2006 total solar eclipse: on the left a single image with 1/8s exposure time and on the right an HDR composite of images with exposure times of 1/8s to 1/1000s. M.Weigand
A total solar eclipse is considerably more impressive visually than anything that can be achieved with today’s digital cameras – at least not without the help of advanced techniques. This is due to the special characteristics of the eye. In contrast to linear camera chips with uniform sensitivity, the eye perceives differences in brightness logarithmically, and adapts dynamically. We can easily see the corona’s fine filaments from the black edge of the lunar disk to several solar radii far into the deep dark blue of the sky. However, documenting this event photographically presents something of a technical imaging challenge.
In order to represent the corona in a way that most accurately corresponds to the visual appearance, its high contrast must be compressed. However, this is not possible with a single DSLR image. Instead, the high dynamics are captured by combining different exposures into a high dynamic range (HDR) composite. The basic prerequisite is a series of exposures that covers the different sections of the corona. Depending on the light-gathering capabilities of the optics and the ISO setting selected, the exposure times are typically between 1/1000s for the innermost sections and a few seconds for the expansive corona rays. Guides to exposure time for your own equipment can be determined using Xavier Jubier’s online calculator. A series of exposures for an HDR composite consists of around ten exposures with exposure times that vary between the two extreme values.
Luminance HDR, which can be downloaded free of charge, is a suitable program for processing such a series of images. The work sequence consists of two phases, which are described below.
Creating the HDR image
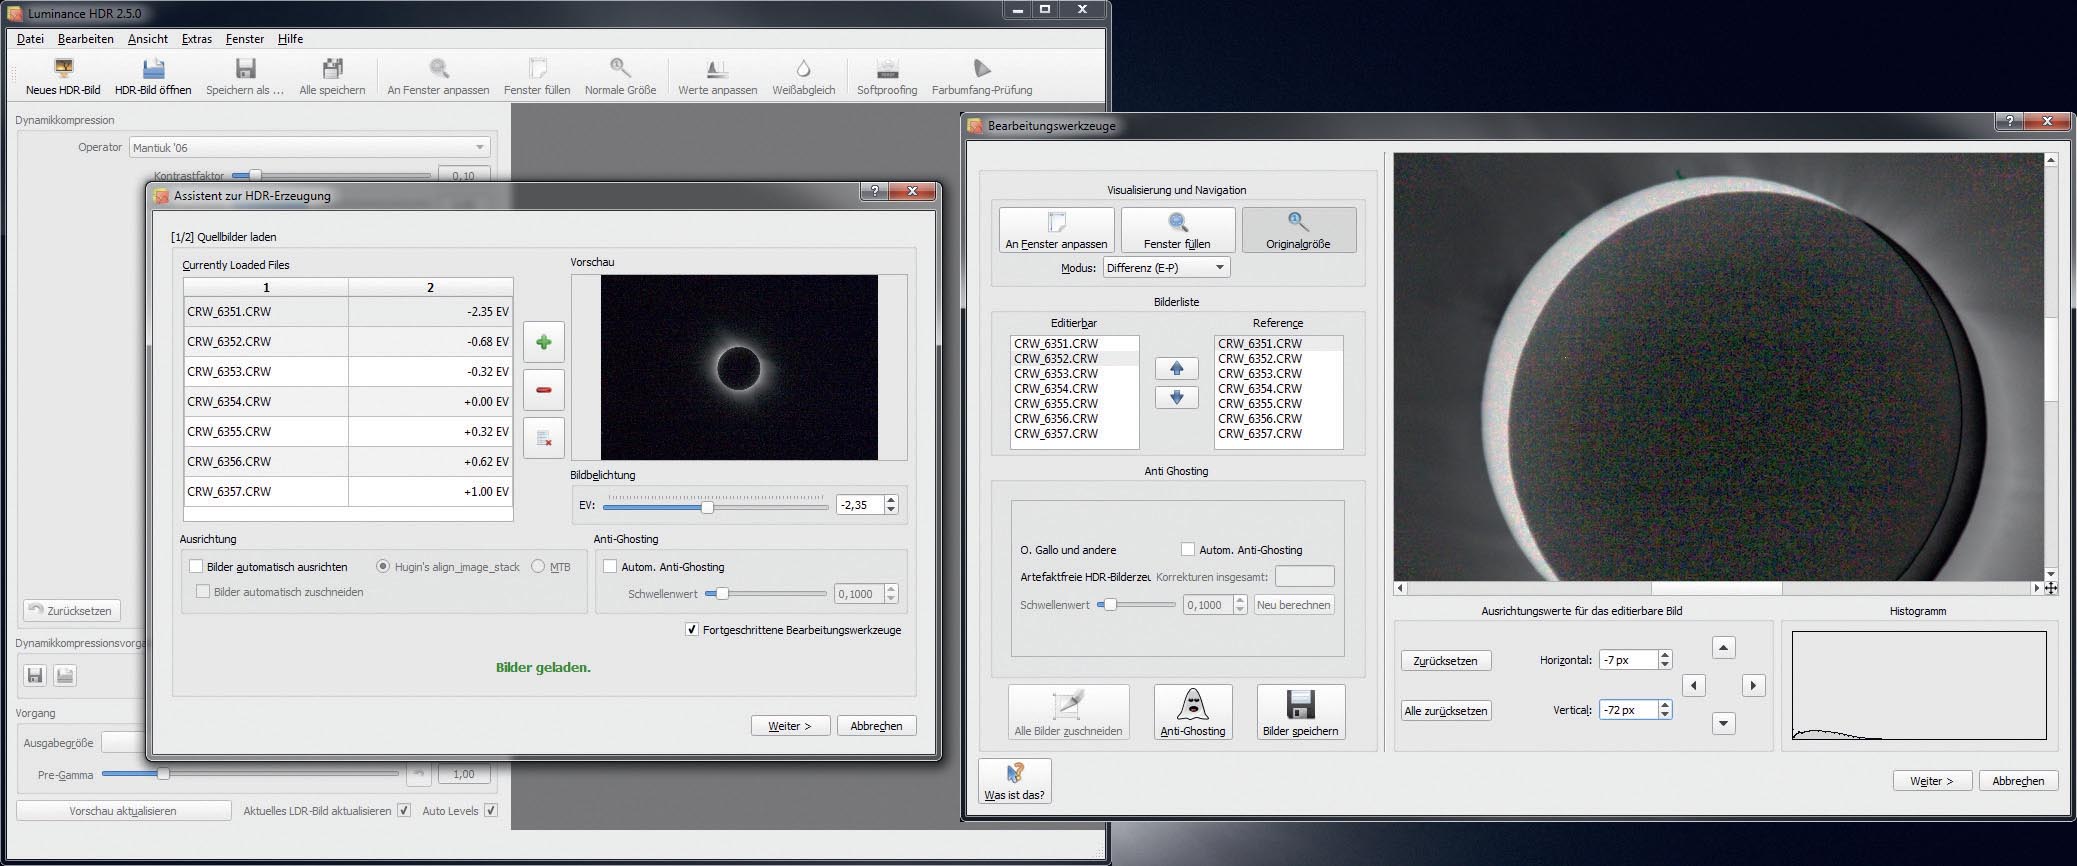
After starting Luminance HDR, a RAW image series is loaded by selecting New HDR Image in the menu bar. Exposure values (EV) are listed next to the names of the loaded files. These values are required to compile the HDR image and are usually included in the images' metadata. Any anti-ghosting functions are irrelevant for a solar eclipse composite and should remain disabled. Before the composite can be created, the image alignment needs to be optimised. Although it takes just a few seconds to shoot a set of exposures, poor tracking can cause a slight offset between the images. Therefore, for a nice result, the image alignment should be carefully checked. Unfortunately, the program’s automatic alignment is not suitable for this. For manual alignment, a check mark must be set for Advanced Editing Tools. In the next dialogue box, an image subtraction view helps you to merge the images with pixel-perfect accuracy. If all the images are aligned correctly, the HDR profile is selected in the last step before the HDR generation. There are six different profiles available, although profile 3 is not recommended, as it does not produce clean transitions. You should get very good composites with profiles 1, 2 and 6 which, in that order, provide ever greater suppression of the lighter sections.
 Luminance HDR program when creating a new HDR image. The image series can be loaded in the left-hand dialogue box. Besides a check mark for Advanced Editing Tools, no additional settings are required The dialogue box on the right allows the images to be checked and aligned for offsets. M. Weigand
Conversion into an LDR image
The second important step is to map the HDR image to a lower dynamic range, also known as tone mapping. Generally, the check for Auto Levels should be removed for further processing, as the automatic system does not provide good results. Pre-gamma can be used to adjust the gradation curve prior to dynamic compression. This is optional and the value can be left at 1.0 to begin with.
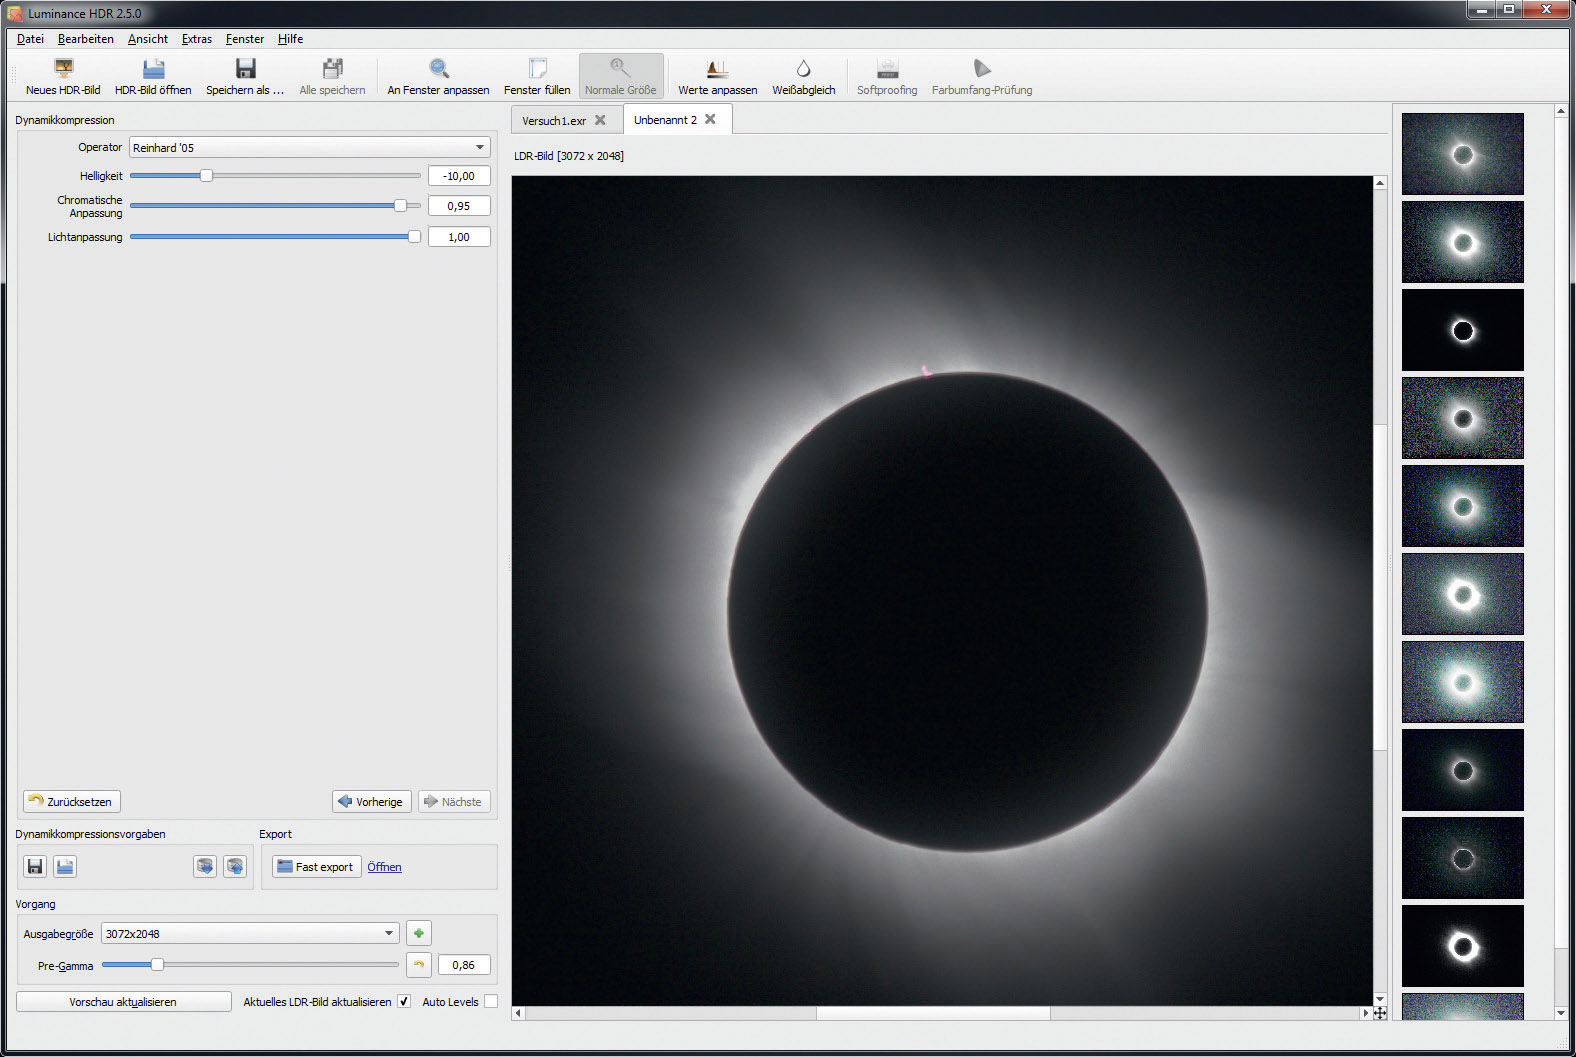
Luminance HDR offers various operators for dynamic compression. Previews for this can be seen in the right image bar. However, they generally do not look good and it is tedious to try out the different variants and parameters. However, the Reinhard '05 operator delivers very nice results and is therefore recommended. In addition, there are only three simple parameters to set besides self-explanatory brightness control, chromatic adjustment influences colour saturation. If there is too much colour noise in the darker areas, the value must be increased. Finally, the extent to which dark sections of the image are lifted is determined by the luminance adjust parameter. Its value should be set rather high. The limiting factor here too is the image noise in the dark areas.
Last but not least, if necessary, additional tonal correction can be performed using Adjust Values in the main menu bar. The desired Low Dynamic Range (LDR) image is then ready and is exported as TIFF or JPEG, for example, via Save As.
 The dynamic compression adjustment window. The operator parameters can be adjusted in the left pane. The example shows an LDR image after a Reinhard '05 compression. On the right side of the window, you can see previews for the various operators. M. Weigand
The bottom line
The tone mapping process is strongly oriented towards the physiology of human vision. Even if the visual experience cannot yet be reproduced perfectly, HDR technology achieves a representation of the corona that is quite close to the visual appearance.
Author: Mario Weigand / Licence: Oculum Verlag GmbH
